

Yes, for most functions of the PRO, you do need an internet connection, whether via Wi-Fi or Ethernet.
Yes, you can connect them via RCA to active speakers, such as bookshelf speakers which have built-in amplifiers. You may also connect to speaker systems with an amplifier.
JazPiper automatically adds new songs regularly to our servers, so you don’t have to do anything. Check in “Songs” from the homepage to see the latest songs.
Yes, the JazPiper PRO runs on Android, so you may install apps from the Play Store or install your own APK files.
1. Plug in the power adapter into an electrical outlet, and plug in the DC connector into the DC-IN port at the back of the PRO.
2. Turn it on by either using the remote control, or by holding down the power button at the right side of the soundbar.
3. The display at the front of the soundbar will show “AND”.
2. Turn it on by either using the remote control, or by holding down the power button at the right side of the soundbar.
3. The display at the front of the soundbar will show “AND”.
1. Plug in the subwoofer power cable into an electrical outlet, and plug in the other end to the subwoofer.
2. The LED will turn red at first, and will show blue if its paired to the soundbar.
2. The LED will turn red at first, and will show blue if its paired to the soundbar.
1. Connect a HDMI cable from your display (TV, monitor, projector etc.) to the JazPiper PRO’s HDMI OUT port.
2. On your display, make sure the source settings are correct.
2. On your display, make sure the source settings are correct.
You can try locking your microphone to your JazPiper with the following steps.
With both the soundbar and microphone powered on,
1. Hold down the power and + buttons on your microphone, until IdON appears on the microphone screen.
2. A lockpad symbol will appear on the microphone screen.
With both the soundbar and microphone powered on,
1. Hold down the power and + buttons on your microphone, until IdON appears on the microphone screen.
2. A lockpad symbol will appear on the microphone screen.
1. On your JazPiper, make sure you have plugged into the correct HDMI port labelled HDMI OUT instead of HDMI ARC.
2. Check the source settings on your external display. You may have selected the wrong channel or source.
2. Check the source settings on your external display. You may have selected the wrong channel or source.
1. Make sure your JazPiper is not accidentally muted.
2. Make sure your volume is not accidentally set to 0.
2. Make sure your volume is not accidentally set to 0.
Drivers: 4 x 3" Full-range + 2 x 2" Tweeters
Power Adapter: 24V / 2.5A
Connectivity: HDMI, HDMI ARC, Optical-In (Toslink), 3.5mm Line-out, USB, RJ-45, Wi-Fi, Bluetooth 5.0
Dimension: 660 (L) x 110 (W) x 85 (H) mm
Weight: 2.3Kg
Power Output: 90w (Peak Power: 300w)
Power Adapter: 24V / 2.5A
Connectivity: HDMI, HDMI ARC, Optical-In (Toslink), 3.5mm Line-out, USB, RJ-45, Wi-Fi, Bluetooth 5.0
Dimension: 660 (L) x 110 (W) x 85 (H) mm
Weight: 2.3Kg
Power Output: 90w (Peak Power: 300w)
Driver: 6.5” Woofer
Connection Type: Wireless
Dimension: 152 (L) x 293 (W) x 330 (H) mm
Weight: 4Kg
Power Output: 50w
Connection Type: Wireless
Dimension: 152 (L) x 293 (W) x 330 (H) mm
Weight: 4Kg
Power Output: 50w
Frequency: 636MHz - 686.5MHz
Range: Up to 50m
Battery: Removable Li-ion 18650
Charging: USB Type-C
Usage Duration: Up to 8-hours
Range: Up to 50m
Battery: Removable Li-ion 18650
Charging: USB Type-C
Usage Duration: Up to 8-hours
Yes, for most functions of the MAX, you do need an internet connection, whether via Wi-Fi or Ethernet.
Yes, you can connect them via RCA to active speakers, such as bookshelf speakers which have built-in amplifiers. You may also connect to speaker systems with an amplifier.
JazPiper automatically adds new songs regularly to our servers, so you don’t have to do anything. Check in “Songs” from the homepage to see the latest songs.
Yes, the JazPiper MAX runs on Android, so you may install apps from the Play Store or install your own APK files.
1. Plug in the power adapter into an electrical outlet, and plug in the DC connector into the DC-IN port at the back of the MAX.
2. Turn it on by either using the remote control, or by holding down the “M” button at the front of the MAX.
3. The display at the front of the MAX will show “AND”.
2. Turn it on by either using the remote control, or by holding down the “M” button at the front of the MAX.
3. The display at the front of the MAX will show “AND”.
1. Connect a HDMI cable from your display (TV, monitor, projector etc.) to the JazPiper MAX’s HDMI OUT port.
2. On your display, make sure the source settings are correct.
2. On your display, make sure the source settings are correct.
You can try locking your microphone to your JazPiper with the following steps.
With both the soundbar and microphone powered on,
1. Hold down the power and + buttons on your microphone, until IdON appears on the microphone screen.
2. A lockpad symbol will appear on the microphone screen.
With both the soundbar and microphone powered on,
1. Hold down the power and + buttons on your microphone, until IdON appears on the microphone screen.
2. A lockpad symbol will appear on the microphone screen.
1. On your JazPiper, make sure you have plugged into the correct HDMI port labelled HDMI OUT instead of HDMI ARC.
2. Check the source settings on your external display. You may have selected the wrong channel or source.
2. Check the source settings on your external display. You may have selected the wrong channel or source.
1. Make sure your JazPiper is not accidentally muted.
2. Make sure your volume is not accidentally set to 0.
2. Make sure your volume is not accidentally set to 0.
Drivers: 2 x 4" Full-range + 2 x 2" Tweeters + 6.5" Subwoofer
Power Adapter: 24V / 2.5A
Connectivity: HDMI, HDMI ARC, Optical-In (Toslink) ,3.5mm Line-out, USB, RJ-45, Wi-Fi, Bluetooth 5.0
Dimension: 490 (L) x 260 (W) x 166 (H) mm
Weight: 7.3Kg
Power Output: 80w (Peak Power: 280w)
Power Adapter: 24V / 2.5A
Connectivity: HDMI, HDMI ARC, Optical-In (Toslink) ,3.5mm Line-out, USB, RJ-45, Wi-Fi, Bluetooth 5.0
Dimension: 490 (L) x 260 (W) x 166 (H) mm
Weight: 7.3Kg
Power Output: 80w (Peak Power: 280w)
Frequency: 636MHz - 686.5MHz
Range: Up to 50m
Battery: Removable Li-ion 18650
Charging: USB Type-C
Usage Duration: Up to 8-hours
Range: Up to 50m
Battery: Removable Li-ion 18650
Charging: USB Type-C
Usage Duration: Up to 8-hours
Yes, for most functions of the GO, you do need an internet connection, whether via Wi-Fi or Ethernet.
Yes, you can connect them via RCA to active speakers, such as bookshelf speakers which have built-in amplifiers. You may also connect to speaker systems with an amplifier.
JazPiper automatically adds new songs regularly to our servers, so you don’t have to do anything. Check in “Songs” from the homepage to see the latest songs.
Yes, the JazPiper GO runs on Android, so you may install apps from the Play Store or install your own APK files.
1. Plug in the power adapter into an electrical outlet, and plug in the DC connector into the DC-IN port at the back of the GO.
2. Turn it on by either using the remote control, or by holding down the power button at the back, located beside the DC-IN port.
3. The LED at front will turn blue.
2. Turn it on by either using the remote control, or by holding down the power button at the back, located beside the DC-IN port.
3. The LED at front will turn blue.
1. Connect a HDMI cable from your display (TV, monitor, projector etc.) to the JazPiper GO’s HDMI OUT port.
2. On your display, make sure the source settings are correct.
2. On your display, make sure the source settings are correct.
You can try locking your microphone to your JazPiper with the following steps.
With both the soundbar and microphone powered on,
1. Hold down the power and + buttons on your microphone, until IdON appears on the microphone screen.
2. A lockpad symbol will appear on the microphone screen.
With both the soundbar and microphone powered on,
1. Hold down the power and + buttons on your microphone, until IdON appears on the microphone screen.
2. A lockpad symbol will appear on the microphone screen.
1. On your JazPiper, make sure you have plugged into the correct HDMI port labelled HDMI OUT instead of HDMI ARC.
2. Check the source settings on your external display. You may have selected the wrong channel or source.
2. Check the source settings on your external display. You may have selected the wrong channel or source.
1. Make sure your JazPiper is not accidentally muted.
2. Make sure your volume is not accidentally set to 0.
2. Make sure your volume is not accidentally set to 0.
Drivers: 2 x 3" Full-range + 2 x 2" Tweeters + 5.25" Subwoofer
Power Adapter: 24V / 2.5A
Connectivity: HDMI, HDMI ARC, Optical-In (Toslink) ,
Power Adapter: 24V / 2.5A
Connectivity: HDMI, HDMI ARC, Optical-In (Toslink) ,
Frequency: 636MHz - 686.5MHz
Range: Up to 50m
Battery: Removable Li-ion 18650
Charging: USB Type-C
Usage Duration: Up to 8-hours
Range: Up to 50m
Battery: Removable Li-ion 18650
Charging: USB Type-C
Usage Duration: Up to 8-hours
Yes, for most functions of the K-ONE, you do need an internet connection, whether via Wi-Fi or Ethernet.
The K-ONE already comes with its own external speakers. But you may also swap it out for other passive speakers.
JazPiper automatically adds new songs regularly to our servers, so you don’t have to do anything. Check in “Songs” from the homepage to see the latest songs.
No, the K-ONE does not support installing any apps.
1. Connect the power cable from an electrical outlet to the power socket at the back of the K-ONE.
2. Turn the power switch to ON.
3. The K-ONE logo will display on the screen, and will boot into the system shortly
2. Turn the power switch to ON.
3. The K-ONE logo will display on the screen, and will boot into the system shortly
The K-ONE uses a Speakon to banana plug cable to connect to its speakers.
1. Plug in the two Speakon connectors into the K-ONE. Match the notch on the connector to the top of the port to insert it properly.
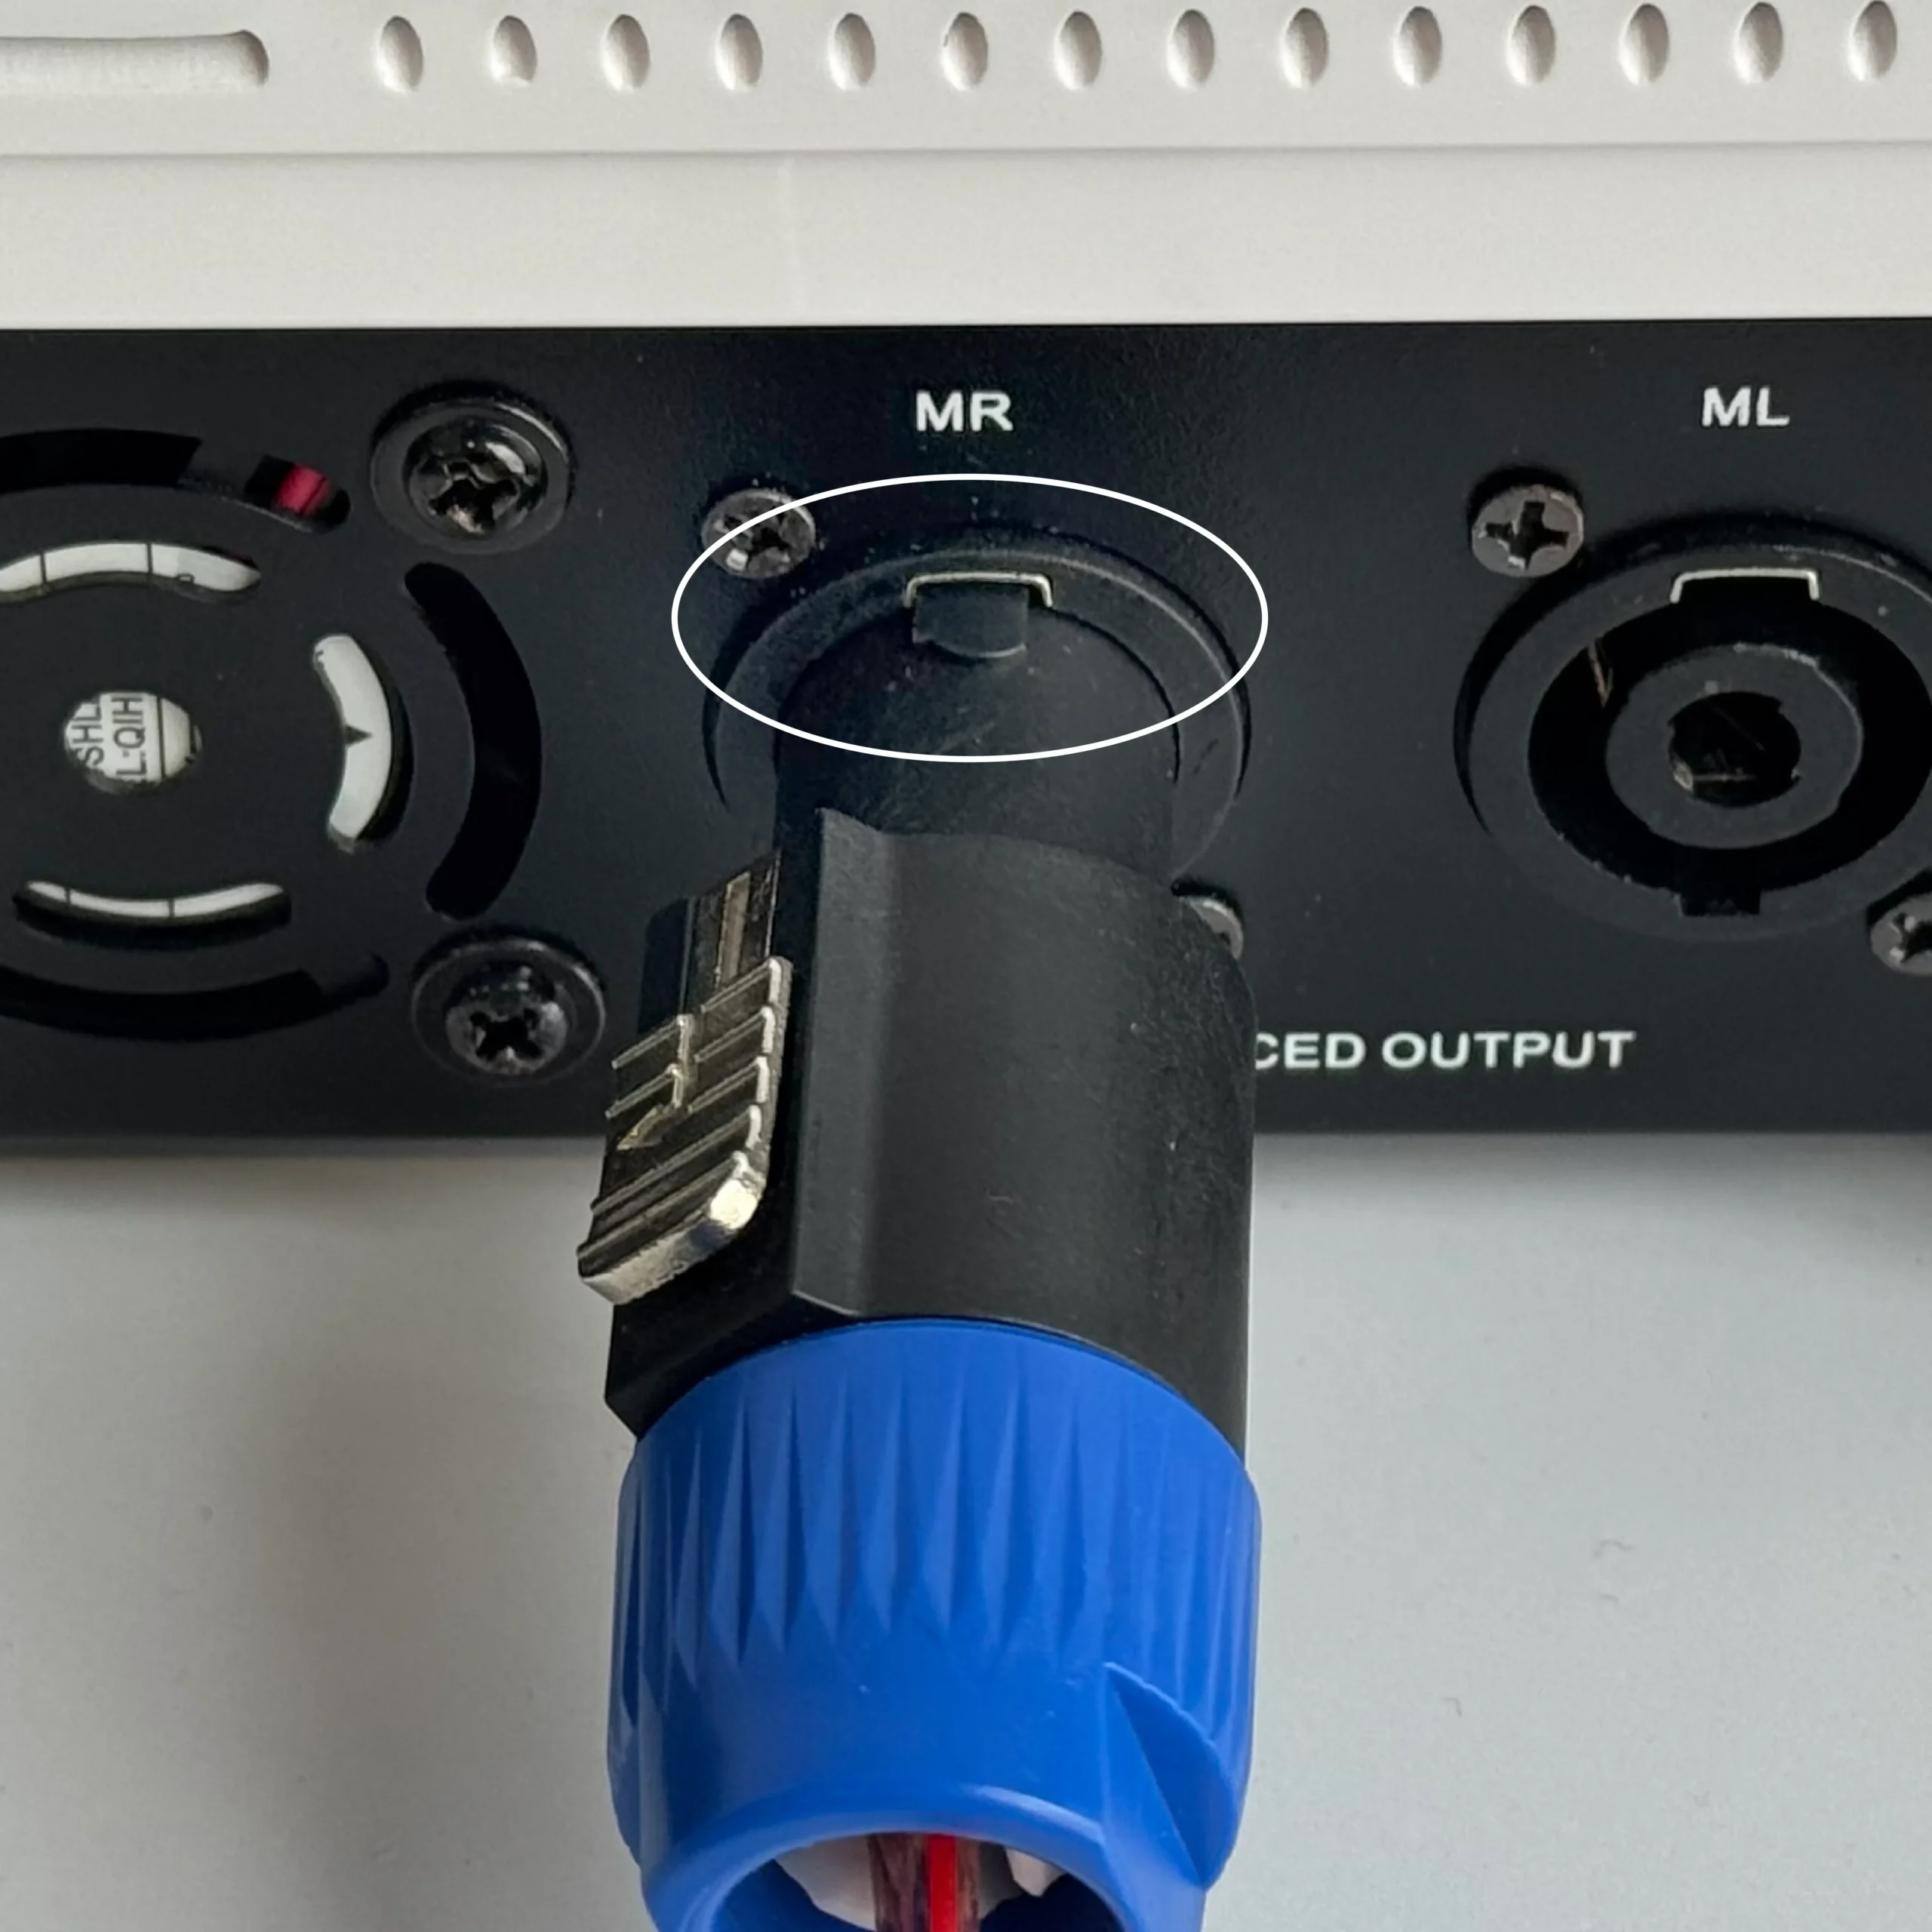
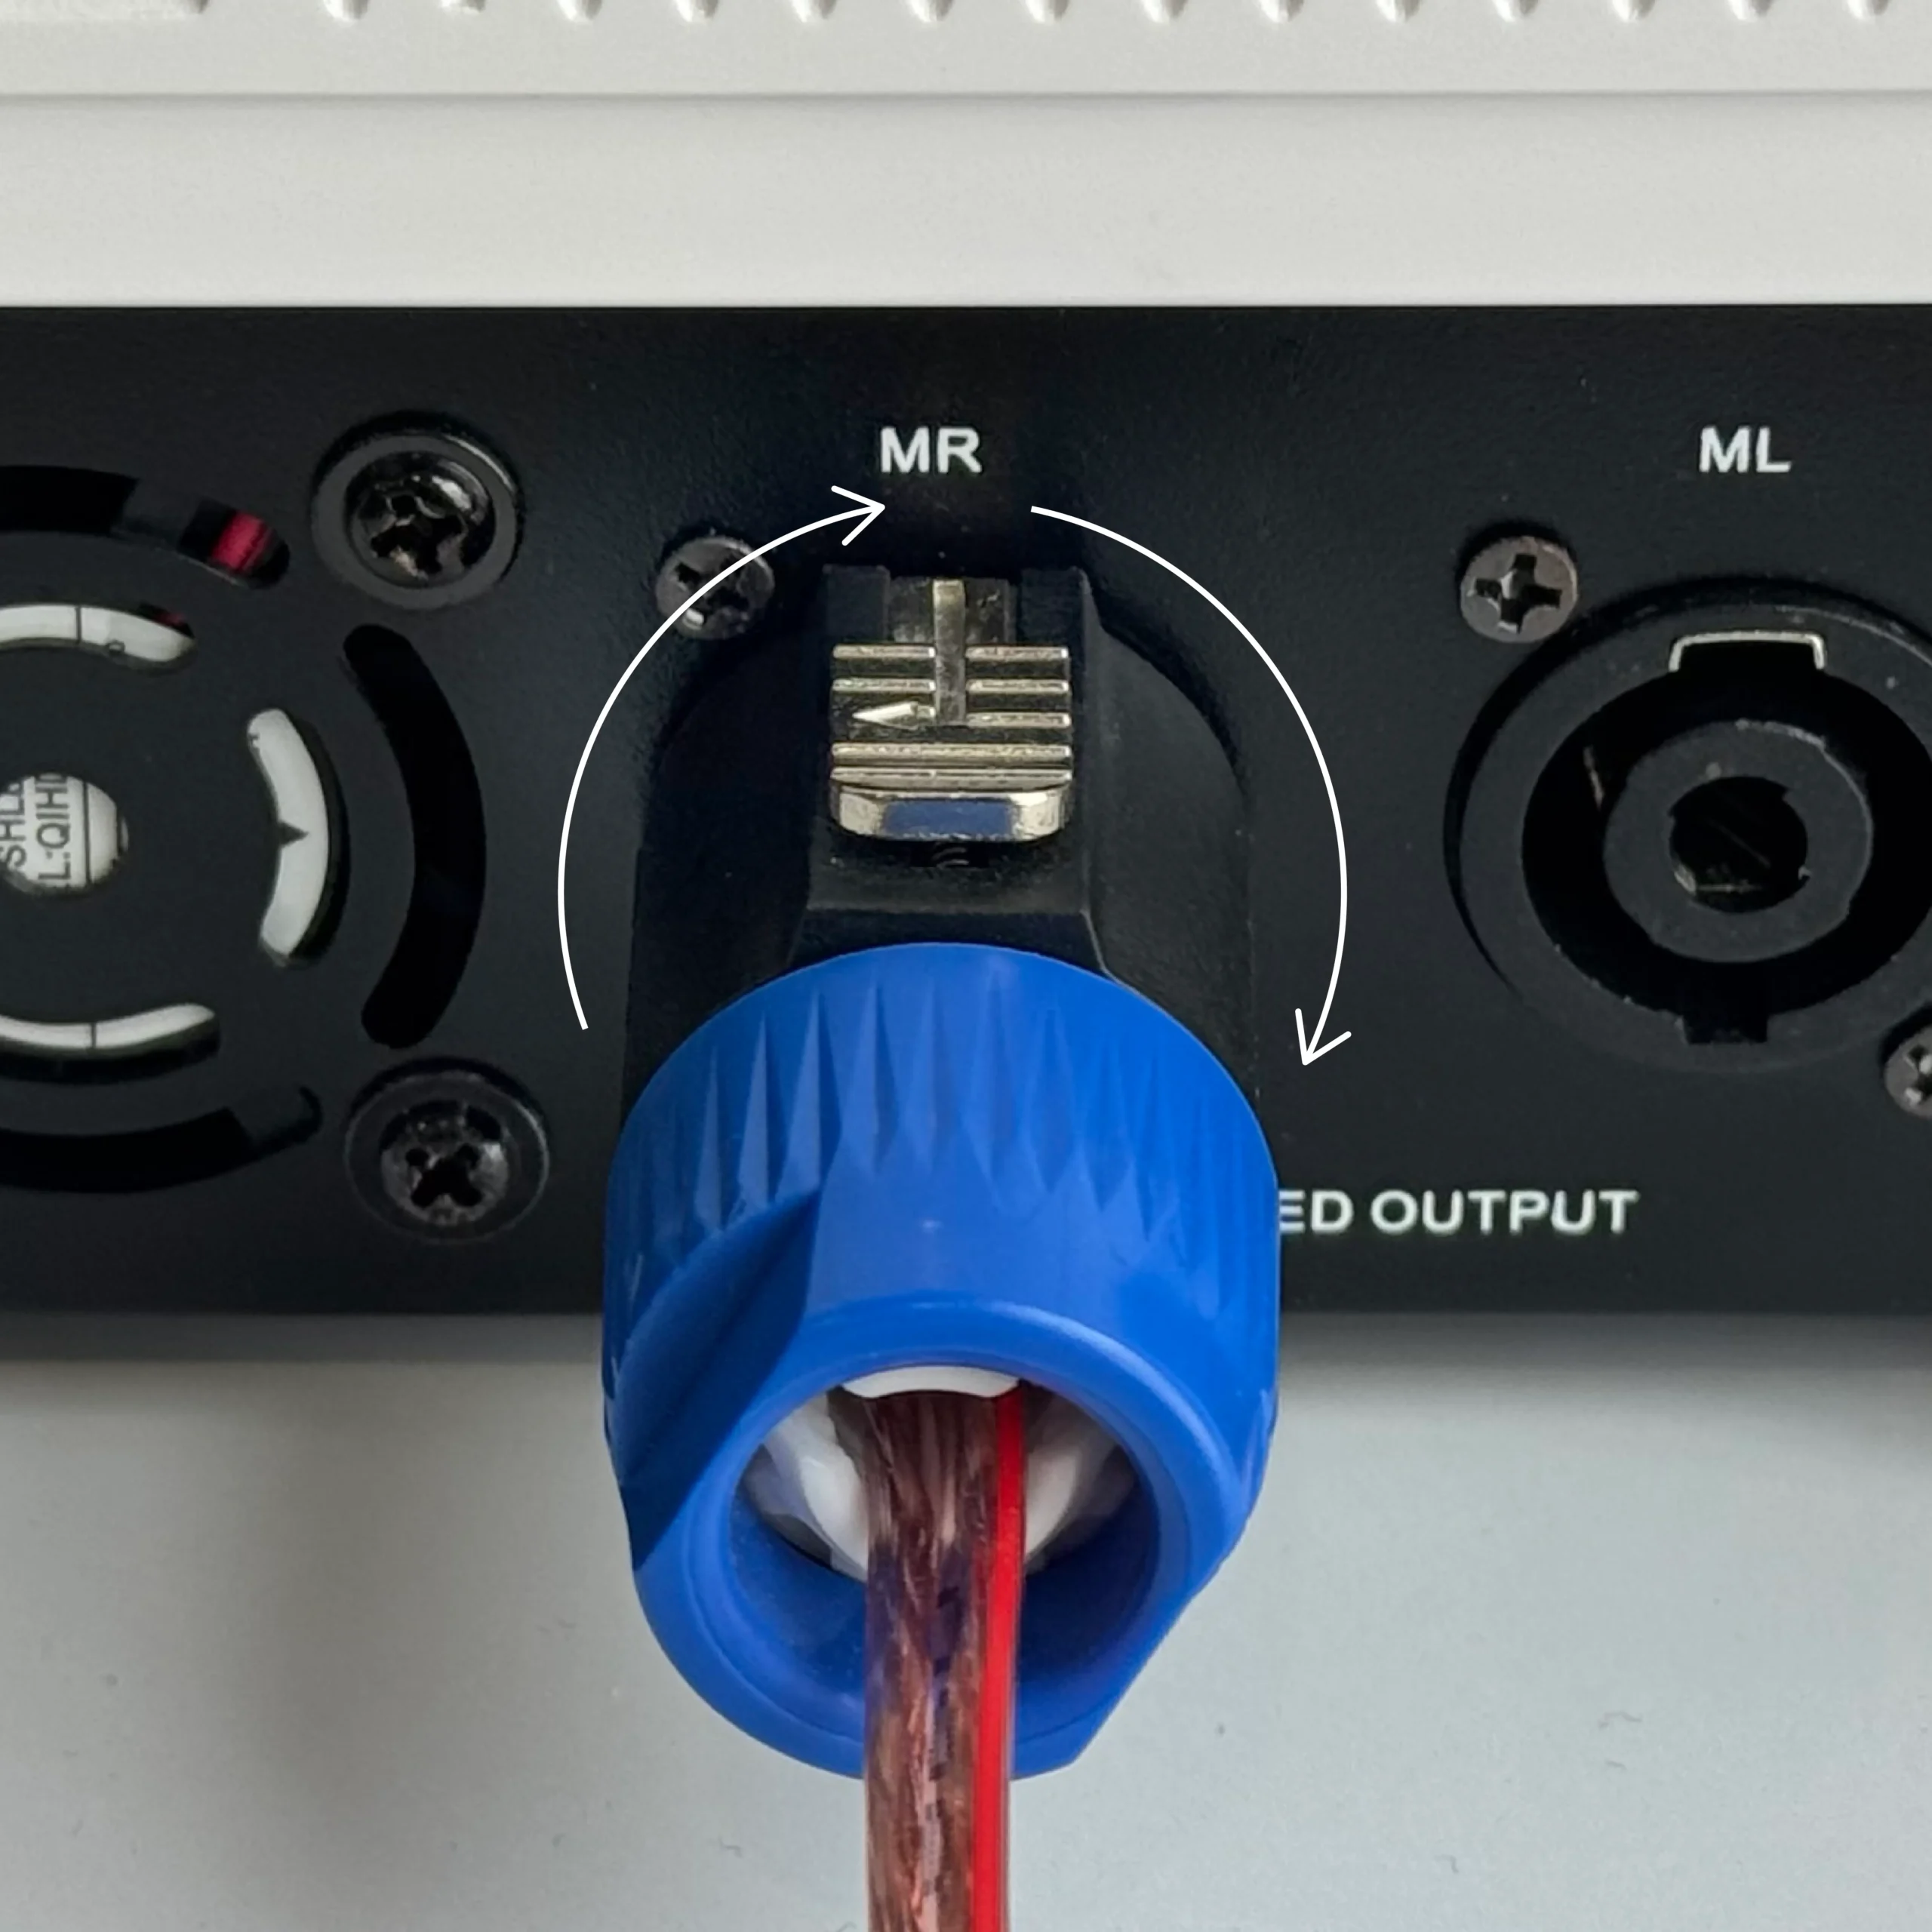
2. Turn the Speakon connector clockwise to lock it in place. The metallic clip will be facing upward if done correctly.
3. On the K-ONE Speakers, connect the banana plugs to the two ports at the back. Match the colors of the plugs to the port.
4. Make sure the speakers are placed correctly. If the speaker is connected to the MR (Right) port, place it on the right side, and if connected to the ML (Left) port, place it on the left.
1. Plug in the two Speakon connectors into the K-ONE. Match the notch on the connector to the top of the port to insert it properly.
2. Turn the Speakon connector clockwise to lock it in place. The metallic clip will be facing upward if done correctly.
3. On the K-ONE Speakers, connect the banana plugs to the two ports at the back. Match the colors of the plugs to the port.
4. Make sure the speakers are placed correctly. If the speaker is connected to the MR (Right) port, place it on the right side, and if connected to the ML (Left) port, place it on the left.
You can try locking your microphone to your JazPiper with the following steps.
With the K-ONE powered on, but the microphone powered off,
1. Hold down the SET and power button at the same time for several seconds until the words “Id C” or “Id I” show on the microphone screen.
2. Make sure the “Id” value is set to C. If it shows “Id I”, press the SET button to change it.
3. Hold SET for 3 seconds to exit settings mode.
4. Hold SET again to enter SYNC mode. The words “SYNC” will appear on your microphone screen. While holding SET, press the SYNC button at the back of your K-ONE, located next to the mic antenna.
With the K-ONE powered on, but the microphone powered off,
1. Hold down the SET and power button at the same time for several seconds until the words “Id C” or “Id I” show on the microphone screen.
2. Make sure the “Id” value is set to C. If it shows “Id I”, press the SET button to change it.
3. Hold SET for 3 seconds to exit settings mode.
4. Hold SET again to enter SYNC mode. The words “SYNC” will appear on your microphone screen. While holding SET, press the SYNC button at the back of your K-ONE, located next to the mic antenna.
Check the source settings on your external display. You may have selected the wrong channel or source.
1. Make sure your JazPiper is not accidentally muted.
2. Make sure your volume is not accidentally set to 0.
3. Make sure that your Speakon cables are connected properly from your K-ONE to your K-ONE speakers.
2. Make sure your volume is not accidentally set to 0.
3. Make sure that your Speakon cables are connected properly from your K-ONE to your K-ONE speakers.
Connectivity : Wi-Fi 2.4GHz, Ethernet
Display : 21.5-inch 1080p screen + HDMI Output
Audio Output : 350-watt/channel via Speakon
Other I/O Ports : USB OTG x 3
Display : 21.5-inch 1080p screen + HDMI Output
Audio Output : 350-watt/channel via Speakon
Other I/O Ports : USB OTG x 3
Drivers: 2 x 4” Tweeters + 2 x 8” Full-range
Frequency Response: 45Hz - 20kHz
Rated Power: 300w (150w x 2)
Impedance: 4 ohms
Sensitivity: 86 ± 3db
Frequency Response: 45Hz - 20kHz
Rated Power: 300w (150w x 2)
Impedance: 4 ohms
Sensitivity: 86 ± 3db
Yes, for most functions of the GO, you do need an internet connection, whether via Wi-Fi or Ethernet.
Yes, you can connect them via RCA to active speakers, such as bookshelf speakers which have built-in amplifiers. You may also connect to speaker systems with an amplifier.
JazPiper automatically adds new songs regularly to our servers, so you don’t have to do anything. Check in “Songs” from the homepage to see the latest songs.
Yes, the JazPiper GO runs on Android, so you may install apps from the Play Store or install your own APK files.
1. Flip out the MOVE’s touch screen by pulling on it upwards, and turning clockwise so it faces you.
2. Turn on the MOVE by simply pressing on the power button located at the top left side.
3. The MOVE boot up screen will appear, and the LED lighting will be lit up.
2. Turn on the MOVE by simply pressing on the power button located at the top left side.
3. The MOVE boot up screen will appear, and the LED lighting will be lit up.
1. Connect a HDMI cable from your display (TV, monitor, projector etc.) to the JazPiper MOVE’s HDMI OUT port.
2. On your display, make sure the source settings are correct.
2. On your display, make sure the source settings are correct.
You can try locking your microphone to your JazPiper with the following steps.
With both the MOVE and microphone powered on,
1. Hold down the SET button on the mic until “Id” appears on the microphone screen.
2. A lockpad symbol will appear on the microphone screen.
With both the MOVE and microphone powered on,
1. Hold down the SET button on the mic until “Id” appears on the microphone screen.
2. A lockpad symbol will appear on the microphone screen.
1. On your JazPiper, make sure you have plugged into the correct HDMI port labelled HDMI OUT instead of HDMI ARC.
2. Check the source settings on your external display. You may have selected the wrong channel or source.
2. Check the source settings on your external display. You may have selected the wrong channel or source.
1. Make sure your JazPiper is not accidentally muted.
2. Make sure your volume is not accidentally set to 0. Scroll the right wheel up to increase volume.
2. Make sure your volume is not accidentally set to 0. Scroll the right wheel up to increase volume.
Drivers: 2 x 4" Full-range + 2 x 2" Tweeters
Power Adapter: 15V / 3.0A
Connectivity: HDMI, 3.5mm AUX OUT, 3.5mm AUX IN, USB-C, USB 3.0, USB, MicroSD, Wi-Fi, Bluetooth 5.3, 6.35mm Microphone / Guitar IN
Dimension: 190 (L) x 390 (W) x 530 (H) mm
Weight: 8.1Kg
Power Output: 80w (Peak Power: 280w)
Power Adapter: 15V / 3.0A
Connectivity: HDMI, 3.5mm AUX OUT, 3.5mm AUX IN, USB-C, USB 3.0, USB, MicroSD, Wi-Fi, Bluetooth 5.3, 6.35mm Microphone / Guitar IN
Dimension: 190 (L) x 390 (W) x 530 (H) mm
Weight: 8.1Kg
Power Output: 80w (Peak Power: 280w)
Frequency: 636MHz - 686.5MHz
Range: Up to 50m
Battery: Removable Li-ion 18650
Charging: USB Type-C
Usage Duration: Up to 8-hours
Range: Up to 50m
Battery: Removable Li-ion 18650
Charging: USB Type-C
Usage Duration: Up to 8-hours
Yes, for most functions of the PRO X, you do need an internet connection, whether via Wi-Fi or Ethernet.
Yes, you can connect them via RCA to active speakers, such as bookshelf speakers which have built-in amplifiers. You may also connect to speaker systems with an amplifier.
JazPiper automatically adds new songs regularly to our servers, so you don’t have to do anything. Check in “Songs” from the homepage to see the latest songs.
Yes, the JazPiper PRO X runs on Android, so you may install apps from the Play Store or install your own APK files.
1. Plug in the power adapter into an electrical outlet, and plug in the DC connector into the DC-IN port at the back of the PRO X.
2. Turn it on by either using the remote control, or by holding down the power button located on top of the soundbar.
3. The display at the front of the soundbar will show “AND”.
2. Turn it on by either using the remote control, or by holding down the power button located on top of the soundbar.
3. The display at the front of the soundbar will show “AND”.
While your PRO X soundbar is powered off and the switch is flipped to OFF,
1. Plug in the subwoofer power cable into an electrical outlet, and plug in the other end to the subwoofer. The LED at the back will light up red at first.
2. Now turn on your soundbar. The LED will shortly turn blue if it's paired to the soundbar.
1. Plug in the subwoofer power cable into an electrical outlet, and plug in the other end to the subwoofer. The LED at the back will light up red at first.
2. Now turn on your soundbar. The LED will shortly turn blue if it's paired to the soundbar.
1. Connect a HDMI cable from your display (TV, monitor, projector etc.) to the JazPiper PRO X’s HDMI OUT port.
2. On your display, make sure the source settings are correct.
2. On your display, make sure the source settings are correct.
You can try locking your microphone to your JazPiper with the following steps.
With both the soundbar and microphone powered on,
1. Hold down the power and + buttons on your microphone, until IdON appears on the microphone screen.
2. A lockpad symbol will appear on the microphone screen.
With both the soundbar and microphone powered on,
1. Hold down the power and + buttons on your microphone, until IdON appears on the microphone screen.
2. A lockpad symbol will appear on the microphone screen.
1. On your JazPiper, make sure you have plugged into the correct HDMI port labelled HDMI OUT instead of HDMI ARC.
2. Check the source settings on your external display. You may have selected the wrong channel or source.
2. Check the source settings on your external display. You may have selected the wrong channel or source.
1. Make sure your JazPiper is not accidentally muted.
2. Make sure your volume is not accidentally set to 0.
2. Make sure your volume is not accidentally set to 0.
Drivers: 4 x 2.75" Mid-range + 2 x 2" Tweeters + 2 x 2.5” Upfiring
Power Adapter: 24V / 4.2A
Connectivity: HDMI, HDMI ARC, Optical-In (Toslink), 3.5mm Line-out, USB, RJ-45, Wi-Fi, Bluetooth 5.0
Dimension: 1000 (L) x 140 (W) x 86 (H) mm
Weight: 3.75Kg
Power Output: 100w (Peak Power: 350w)
Power Adapter: 24V / 4.2A
Connectivity: HDMI, HDMI ARC, Optical-In (Toslink), 3.5mm Line-out, USB, RJ-45, Wi-Fi, Bluetooth 5.0
Dimension: 1000 (L) x 140 (W) x 86 (H) mm
Weight: 3.75Kg
Power Output: 100w (Peak Power: 350w)
Driver: 8” Woofer
Connection Type: Wireless
Dimension: 260 (L) x 260 (W) x 420 (H) mm
Weight: 6.2Kg
Power Output: 140w
Connection Type: Wireless
Dimension: 260 (L) x 260 (W) x 420 (H) mm
Weight: 6.2Kg
Power Output: 140w
Frequency: 636MHz - 686.5MHz
Range: Up to 50m
Battery: Removable Li-ion 18650
Charging: USB Type-C
Usage Duration: Up to 8-hours
Range: Up to 50m
Battery: Removable Li-ion 18650
Charging: USB Type-C
Usage Duration: Up to 8-hours